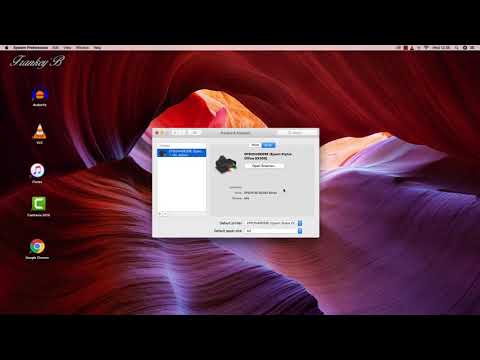
True" Frankie. Frankie be technology poor. Frankie be Frankie the technology tutorial. Hi, I'm Frankie B. This tutorial is about how to add a printer and scanner to your Mac computer. Adding a printer to your Mac is not difficult and it is quite a straightforward thing to do. So, I'm going to show you how to connect a Wi-Fi printer and scanner to your Mac computer. The first thing you need to do is to make sure that your printer is turned on and connected to your network. Also, ensure that you're logged in to your computer as the administrator so that you'll be able to add and remove programs and make changes to your computer. Now, go to this opera icon logo on the top left-hand corner of your screen. Click on it and from the dropdown menu, select System Preferences. This turn-up will appear. From here, go to the Printers and Scanners icon. Right now, the first thing we're going to do is delete this printer in here (pointing at the screen). This is like the printer. Click on the minus sign down here. It will ask, "Are you sure you want to delete this printer?" Then, you will say yes and click on "Printer and Printer Scanner or Fax" from your computer. Now, we're going to add a printer from a clean slate. The first thing you need to do is click on this plus sign here. This dialog will appear. As long as your printer is connected to your network and turned on, select the default printer icon up here and select your printer name from the list down below. Here, your computer will scan the network and find your printer. When it finds your printer, it will automatically set up your printer, install your latest drivers, and be ready...
Award-winning PDF software


Video instructions and help with filling out and completing Dd 1750